Flower jar card - Biglietto di auguri con vaso di fiori
Non sottovalutate un biglietto di auguri fatto a mano, perchè può davvero rendere speciale qualsiasi occasione 😊.
E' per questo che oggi condividerò con voi un'idea per una card colorata e super semplice da realizzare che potrete sfruttare in molti modi diversi.
Ciò che rende questo progetto facile e veloce è, come sempre, il cartamodello che ho preparato per voi (trovate il link per scaricarlo nella lista dei materiali più in basso), nel quale ho inserito ben 4 banner alternativi fra i quali scegliere.
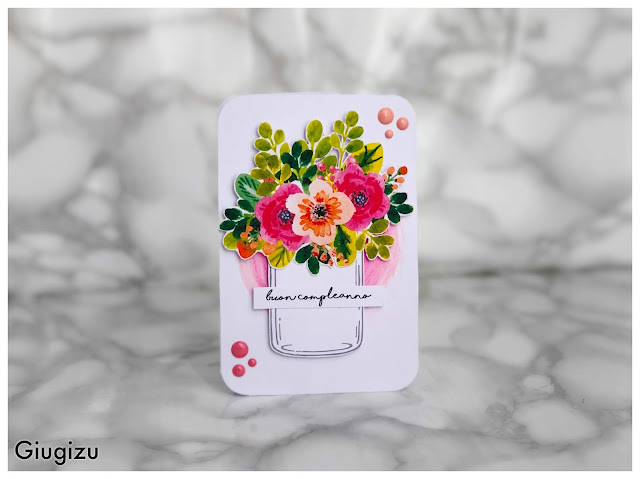
Ecco la mia versione 😁
Don't underestimate an handmade card, as it can actually make a great difference 😊
That's why today I'm sharing with you an idea for a colorfull and super easy card that you'll be able to use in many different ways.
What makes this project easy and quick it's , as usual the template that I designed (which you can download for free, you'll find the link in the supplies list below) that includes 4 different sentiments.
Here is my version 😁


Dopo aver stampato il cartamodello su cartoncino bianco ho ritagliato e ripiegato la base per il biglietto ed ho usato un pastello acquerellabile fuscia per creare lo sfondo (ho semplicemente disegnato un tondo ed ho acquerellato con un pennello ed un po' d'acqua).
Dopo di che ho ritagliato anche il vaso, la composizione floreale ed il banner con la scritta; ho incollato il vaso ed i fiori usando degli adesivi dimensionali (volendo potete anche usare del nastro gommato di quello che si trova in ferramenta o al super mercato) ed ho inserito il banner sopra al vaso usando della colla per carta.
Per finire ho aggiunto degli adesivi smaltati ed ho arrotondato gli angoli, ma sono passaggi opzionali.
After I printed the template on white cardstock I cut and folded the card base , then I used a watercolor pencil to create the background circle (I simply drew a round shape and I watercolored it using a brush and some water).
I then cut out the jar, the flowers and the banner too and I assembled the card using foam dots to add the flowers jar, while I ahered the banner on the jar using regular glue.
As last step I addes some enamel dots and I rounded the corners, but these are optional steps.
Ok passo e chiudo e vi aspetto al prossimo post xxx 😘
That's it for today, if this card inspired you don't forget to share the post with all your friends and if you haven't yet subscribe to my blog (by clicking on the join this site widget on the top right of the page).
Now it's time to go, but be sure to be back for my next post xxx 😘
E' per questo che oggi condividerò con voi un'idea per una card colorata e super semplice da realizzare che potrete sfruttare in molti modi diversi.
Ciò che rende questo progetto facile e veloce è, come sempre, il cartamodello che ho preparato per voi (trovate il link per scaricarlo nella lista dei materiali più in basso), nel quale ho inserito ben 4 banner alternativi fra i quali scegliere.
Ecco la mia versione 😁

Don't underestimate an handmade card, as it can actually make a great difference 😊
That's why today I'm sharing with you an idea for a colorfull and super easy card that you'll be able to use in many different ways.
What makes this project easy and quick it's , as usual the template that I designed (which you can download for free, you'll find the link in the supplies list below) that includes 4 different sentiments.
Here is my version 😁


Dopo aver stampato il cartamodello su cartoncino bianco ho ritagliato e ripiegato la base per il biglietto ed ho usato un pastello acquerellabile fuscia per creare lo sfondo (ho semplicemente disegnato un tondo ed ho acquerellato con un pennello ed un po' d'acqua).
Dopo di che ho ritagliato anche il vaso, la composizione floreale ed il banner con la scritta; ho incollato il vaso ed i fiori usando degli adesivi dimensionali (volendo potete anche usare del nastro gommato di quello che si trova in ferramenta o al super mercato) ed ho inserito il banner sopra al vaso usando della colla per carta.
Per finire ho aggiunto degli adesivi smaltati ed ho arrotondato gli angoli, ma sono passaggi opzionali.
After I printed the template on white cardstock I cut and folded the card base , then I used a watercolor pencil to create the background circle (I simply drew a round shape and I watercolored it using a brush and some water).
I then cut out the jar, the flowers and the banner too and I assembled the card using foam dots to add the flowers jar, while I ahered the banner on the jar using regular glue.
As last step I addes some enamel dots and I rounded the corners, but these are optional steps.
Materiali - Supplies:
- White cardstock
Cartoncino bianco -
Card template (you can download it here)
Cartamodello (potete scaricarlo qui) - Foam squares
Adesivi dimensionali - Watercolor pencilPastello acquerellabile
- My Mind's Eye enamel dots
Gocce smaltate adesive di My Mind's eye - We r memory keepers corner chomper
We r memory keepers corner chomper
Ok passo e chiudo e vi aspetto al prossimo post xxx 😘
That's it for today, if this card inspired you don't forget to share the post with all your friends and if you haven't yet subscribe to my blog (by clicking on the join this site widget on the top right of the page).
Now it's time to go, but be sure to be back for my next post xxx 😘


Commenti
Posta un commento