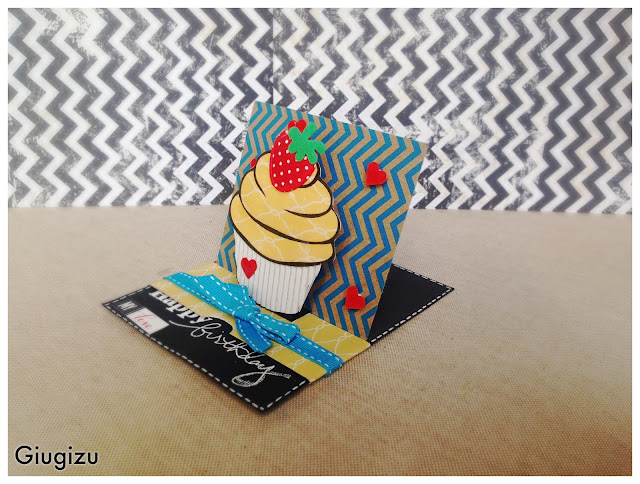
Handmade Pop up Sliding card - Biglietto di auguri fatto a mano con pop up a scorrimento
Ciao giugizers e benvenritrovati sul mio blog,
oggi ho pensato di condividere con voi il tutorial per creare un biglietto di auguri fatto a mano con pop up a scorrimento.
Io ho creato la mia card per il compleanno di mio marito, ma cambiando le decorazioni potete adattarla a qualsiasi altra occasione e stupire con un biglietto unico ed originale.
Ecco il risultato finale!
Hi giugizers and welcome back to my blog,
today I thought I'd show you how to create a cute handmade pop up sliding card.
I made mine to celebrate my husband's birthday, but you can easily adapt it to any other ocassion by changing the decoration and impress your beloved ones with a one of a kind card.
Here is my result!
Se l'idea vi piace guardate il mio tutorial e subito sotto trovete la lista dei materiali necessari ed il template per creare il cupcake (che potrete utilizzare per decorare qualsiasi altra card o perchè no anche un pacco regalo!)
Buona visione!
If you like the idea watch my video tutorial and right below you'll find the supplies list and the link to download the cupcake template (which you can use to decorate any other card or even as an embellishment on a present!)
Enjoy!
Ok passo e chiudo e vi aspetto al prossimo post ♥
That's it for today, if this card inspired you don't forget to share the post with all your friends using the social networks icons down below and if you haven't yet subscribe to my blog (by clicking on the join this site widget on the top right of the page) and to my Youtube channel (by clicking here) in order not to miss any new project.
Now it's time to go, but be sure to be back for my next post ♥
oggi ho pensato di condividere con voi il tutorial per creare un biglietto di auguri fatto a mano con pop up a scorrimento.
Io ho creato la mia card per il compleanno di mio marito, ma cambiando le decorazioni potete adattarla a qualsiasi altra occasione e stupire con un biglietto unico ed originale.
Ecco il risultato finale!
Hi giugizers and welcome back to my blog,
today I thought I'd show you how to create a cute handmade pop up sliding card.
I made mine to celebrate my husband's birthday, but you can easily adapt it to any other ocassion by changing the decoration and impress your beloved ones with a one of a kind card.
Here is my result!
Se l'idea vi piace guardate il mio tutorial e subito sotto trovete la lista dei materiali necessari ed il template per creare il cupcake (che potrete utilizzare per decorare qualsiasi altra card o perchè no anche un pacco regalo!)
Buona visione!
If you like the idea watch my video tutorial and right below you'll find the supplies list and the link to download the cupcake template (which you can use to decorate any other card or even as an embellishment on a present!)
Enjoy!
Materiali - Supplies:
- Plain cardstock (in the color you prefer, I used a black one)
Cartoncino colorato (potete scegliere il colore che preferite io ne ho usato uno nero) - cupcake template, you can download my pdf for free here
Template cupcake, potete scaricare il mio pdf gratuitamente qui -
Glitz Birthday wishes paper pad
Set di cartoncino colorati della collezione Birthday wishes della Glitz -
DCWV The Printed Craft Stack
Set di cartoncini colorati della collezione The Printed Craft Stack di DCWV - Glitz Finley Alphabet & Words Sticker Sheet
Set di adesivi della collezione Finley della Glitz - Technique Tuesday Cake & Candles Stamp set
Set di timbri della collezione Cake & Candles della Technique Tuesday - Ranger Industries Glossy Accent Ranger Industries Glossy Accent
- Artemio White Embossing Powder
Polvere da embossing bianca Artemio - Versamark Ink
Inchiostro per timbri Versamark - Punch Bunch heart punch
Perforatore a forma di cuore della Punch Bunch - Red Cardstock
Cartoncino rosso - Ribbon
Nastro - White gel pen
Penna gel bianca - Tiger Strawberry embellishment
Decorazione a forma di fragola della Tiger - Wavy cookies cardstock
Cartoncino ondulato preso da una confezione di biscotti
Ok passo e chiudo e vi aspetto al prossimo post ♥
That's it for today, if this card inspired you don't forget to share the post with all your friends using the social networks icons down below and if you haven't yet subscribe to my blog (by clicking on the join this site widget on the top right of the page) and to my Youtube channel (by clicking here) in order not to miss any new project.
Now it's time to go, but be sure to be back for my next post ♥


Grazie per il tutorial! Ne ho realizzato uno per un compleanno seguendo le tue istruzioni ma cambiando gli sfondi (che ho colorato a mano) ed è venuto molto bene! Non volevo fare il solito bigliettino spento e per fortuna ho trovato questo blog! La tua spiegazione è stata chiara e semplice, grazie davvero! :)
RispondiElimina