National scrapbooking day 2012 Babies door decoration (or birth ribbon)
La giornata nazionale dello scrapbooking è nata nel 1994 e viene celebrata il primo sabato di Maggio, in questo giorno le scrapbooker americane (e non solo!) festeggiano la loro passione creando e condividendo nuovi progetti.
Anche quest'anno volevo partecipare condividendo un mio progetto ed un tutorial.
Non sono riuscita a postare il tutto in tempo, ma - come si dice - meglio tardi che mai, quindi ecco a voi il mio personale contributo al National scrapbooking day.
Si tratta di una simpatica decorazione per la stanza dei bambini che ho creato su misura per i miei cuginetti :)
Con la stessa tecnica si può realizzare anche un fiocco nascita colorato e diverso dal solito.
The National Scrapbook Day was started in 1994 and is celebrated on the first Saturday each May.
Since 1994 scrapbookers in the U.S. (and not only!!) celebrate their passion for Scrapbooking on this day creating and sharing new projects.Good morning everyone.
I wanted to partecipate to the celebration this year too by sharing one of my projects and a tutorial.
Unfortunately I couldn't post it on the right day, but as people use to say, better late than never!
So here is my contribution a funny babies door deciration which I created for my little nephews
With the same technique you can also create a lovely birth ribbon.
 Materiali:
Cartoncino colorato
Cartone
Nastro
Matita
Righello (o squadretta)
Colla
Colla a caldo
Pinzatrice
Forbici
Circle cutter (o compasso)
Chipboard letters (o in alternativa pennarelli colorati)
Carta velina
Foglie di carta (si trovano nei negozi che vendono forniture per bomboniere, oppure si possono realizzare ritagliando del cartoncino)
Crop-a-dile
Bone folder
Supplies:
Patterned paper
Thick cardstock
Ribbon
Pencil
Ruler
Glue
Hot glue
Stapler
Scissors
Circle cutter
Chipboard letters
Tissue paper
Paper leaves (You may find them in Bombonniere store s or you can cut them out of cardstock)
Crop-a -dile
Bone folder

1. First of all you have to cut 8 15x15cm squares out of patterned paper.


 2. Una volta ritagliati i quadrati segnate con la matita dei riferimenti ogni centimetro e mezzo e tracciate con il bone folder le linee di piega.
2. Once you cut the squares mark with a pencil some reference points every centimeter and a half and use the bone folder to help the folds.

 3. Piegate a fisarmonica lungo le linee tutti i quadrati.
3. Fold accordion style all the squares.

 4. Stendete la colla sulle estremità ed incollatale insieme a creare un cerchio
4. Put some glue on the edges and adhere them together to create a circle.


 5. Una volta incollate le ultime estremità che vanno a chiudere il cerchio appoggiatelo in verticale e premete verso il centro come nella foto.
5. Once you adhered all the edges and the circle is closed, put it in vertical and push towards the center as shown in the picture.
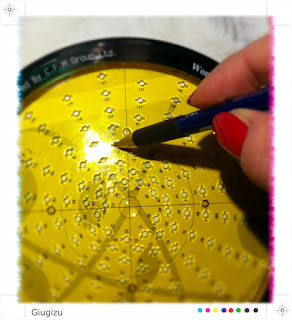
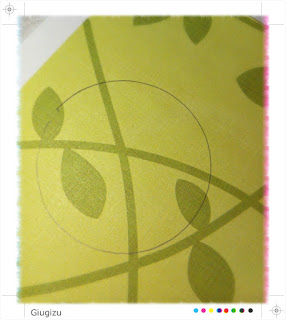
 6.Utilizzando un cirlce cutter o un compasso create sul cartonicno 2 tondi di circa 6 cm e ritagliateli. Applicateli poi con la colla a caldo su entrambi i lati della base in modo da fissarla in posizione.
6. Using a Circle cutter (or a compass) cut 2 6cm circles from the patterned paper. Adhere them with hot glue on both sides of the base in order to keep it opened.
 7. Con lo stesso procedimento create ora un nuovo medaglione scegliendo un cartoncino di diverso colore. Questa volta le dimensioni dei quadrati saranno di 10,5 cmx10,5cm, mentre i tondi di chiusura saranno di circa 5 cm.
7. With the same technique create a new base choosing a different patterned paper. This time the squares will measure 10,5cmx10,5cm and the closing circles around 5cm.
 8. Incollate le due basi insieme con la colla a caldo e inserite il nastro nella parte posteriore fissando con la pinzatrice.
Per finire ritagliare un cerchio di 11 cm dal cartone, copritelo con patterned paper a scelta ed incollatelo con colla a caldo sopra i due livelli creati. A questo punto incollate le chipboard letters (in alternativa si possono scrivere i nomi con un pennarello colorato)
8. Adhere the 2 bases using hot glue and staple the ribbon on the back. Then cut out of thick cardstock a Ø 11 cm circle, cover it with patterned paper and adhere it on top with hot glue. Now you just have to adhere the chipboard letters.
 9. Per appendere più facilmente la decorazione praticate un foro nel nastro ed inserite un eyelet utilizzando il crop-a-dile. (Per chi fosse ineteressato troverete qui un tutorial su come utilizzare questo simpatico attrezzo)
9. To hang the decoration pierce a hole and insert an eyelet on the ribbon using the crop-a-dile.

 10. Aggiungere un ultimo tocco incollando le foglie in carta con la colla a caldo
10. To add a last detail adhere the paper leaves with hot glue
 11. Create un fiore in carta (vedi il tutorial qui) ed incollatelo sopra le foglie
11. Create a tissue paper flower (see the tutorial here) and adhere it with hot glue on the top of the leaves.

 Ed ecco la decorazione finita, non vi resta che appenderla nella stanza dei bambini!!
And here is the finished decoration, you just have to hang it in the babies room!
Se volete vedere il mio contributo dell'anno scorso cliccate qui
If you wish to see my last year contribution click here
Non mi resta che aggiungere...buona giornata nazionale dello scrapbooking...anche se in ritardo
So happy belated scrapbooking day to everyone
Anche quest'anno volevo partecipare condividendo un mio progetto ed un tutorial.
Non sono riuscita a postare il tutto in tempo, ma - come si dice - meglio tardi che mai, quindi ecco a voi il mio personale contributo al National scrapbooking day.
Si tratta di una simpatica decorazione per la stanza dei bambini che ho creato su misura per i miei cuginetti :)
Con la stessa tecnica si può realizzare anche un fiocco nascita colorato e diverso dal solito.
The National Scrapbook Day was started in 1994 and is celebrated on the first Saturday each May.
Since 1994 scrapbookers in the U.S. (and not only!!) celebrate their passion for Scrapbooking on this day creating and sharing new projects.Good morning everyone.
I wanted to partecipate to the celebration this year too by sharing one of my projects and a tutorial.
Unfortunately I couldn't post it on the right day, but as people use to say, better late than never!
So here is my contribution a funny babies door deciration which I created for my little nephews
With the same technique you can also create a lovely birth ribbon.

Cartoncino colorato
Cartone
Nastro
Matita
Righello (o squadretta)
Colla
Colla a caldo
Pinzatrice
Forbici
Circle cutter (o compasso)
Chipboard letters (o in alternativa pennarelli colorati)
Carta velina
Foglie di carta (si trovano nei negozi che vendono forniture per bomboniere, oppure si possono realizzare ritagliando del cartoncino)
Crop-a-dile
Bone folder
Supplies:
Patterned paper
Thick cardstock
Ribbon
Pencil
Ruler
Glue
Hot glue
Stapler
Scissors
Circle cutter
Chipboard letters
Tissue paper
Paper leaves (You may find them in Bombonniere store s or you can cut them out of cardstock)
Crop-a -dile
Bone folder

TUTORIAL
1. Il primo passo consiste nel ritagliare dal cartoncino 8 quadrati 15x15.1. First of all you have to cut 8 15x15cm squares out of patterned paper.


2. Once you cut the squares mark with a pencil some reference points every centimeter and a half and use the bone folder to help the folds.


3. Fold accordion style all the squares.


4. Put some glue on the edges and adhere them together to create a circle.


5. Once you adhered all the edges and the circle is closed, put it in vertical and push towards the center as shown in the picture.

6. Using a Circle cutter (or a compass) cut 2 6cm circles from the patterned paper. Adhere them with hot glue on both sides of the base in order to keep it opened.


7. With the same technique create a new base choosing a different patterned paper. This time the squares will measure 10,5cmx10,5cm and the closing circles around 5cm.

Per finire ritagliare un cerchio di 11 cm dal cartone, copritelo con patterned paper a scelta ed incollatelo con colla a caldo sopra i due livelli creati. A questo punto incollate le chipboard letters (in alternativa si possono scrivere i nomi con un pennarello colorato)
8. Adhere the 2 bases using hot glue and staple the ribbon on the back. Then cut out of thick cardstock a Ø 11 cm circle, cover it with patterned paper and adhere it on top with hot glue. Now you just have to adhere the chipboard letters.

9. To hang the decoration pierce a hole and insert an eyelet on the ribbon using the crop-a-dile.


10. To add a last detail adhere the paper leaves with hot glue

11. Create a tissue paper flower (see the tutorial here) and adhere it with hot glue on the top of the leaves.


And here is the finished decoration, you just have to hang it in the babies room!
Se volete vedere il mio contributo dell'anno scorso cliccate qui
If you wish to see my last year contribution click here
Non mi resta che aggiungere...buona giornata nazionale dello scrapbooking...anche se in ritardo
So happy belated scrapbooking day to everyone


Commenti
Posta un commento