See Through floral birthday card - Biglietto di compleanno floreale perforato
Come avrete notato recentemente mi sono appassionata ai biglietti a tema floreale e vi dico fin da subito che anche la card di oggi è ispirata ad un progetto di Jennifer McGuire.
E' diventata per me quasi una sfida provare a ricreare i suoi progetti in maniera alternativa, anche per dimostrare che non sempre serve acquistare gli attrezzi tecnici del cardmaking 😊
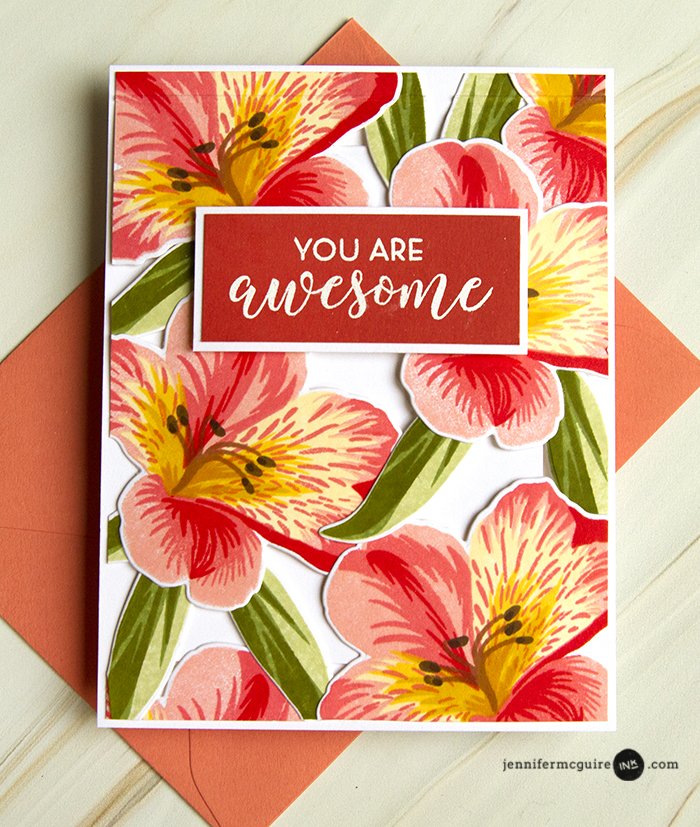
Ecco la card alla quale mi sono ispirata!
As you may have noticed lately I've been loving floral cards and I tell you straight away that today's project was inspired once again by Jennifer McGuire.
It has become a challenge for me to give my own spin to some of her cards, mainly to demonstrate that you don't always have to buy all the techic supplies for cardmaking 😊
Here is the card I was inspired by!
Mi è piaciuta fin da subito l'idea di un biglietto perforato e per realizzare questo progetto ho seguito il tutorial di Jennifer McGuire (che potete vedere qui), ma invece di usare le fustelle ed i timbri ho creato un cartamodello che potete scaricare gratuitamente (trovate il link nella lista dei materiali più in basso). Questa è la card che ho ottenuto.
I loved the idea of a see through card staright away and even if I followed Jennifer McGuire tutorial (which you can find here) I designed a template (that you can download for free, the link is in the suplies list below) to replace the dies and stampes she used. Here is my card!
Dopo aver stampato il cartamodello ho ritagliato i vari dettagli, ho poi sistemato i fiori in modo da creare la parte frontale e li ho incollati insieme lasciando degli spazi vuoti.
Dopo di che ho incollato la parte frontale sulla base ripiegando la parte in alto ed ho ritagliato le parti lateriali in eccesso. Per finite ho inserito la scritta al centro usando degli adesivi dimensionali.
After I printed the template I cut out all the details, then I arranged the flowers in order to create the front of the card and I adhered them together leving some space here and there.
I adhered the front of the card to the back by folding it on top and I cut out the excedding bits from the sides. As last step I added the sentiment with foam squares.
Ok passo e chiudo e vi aspetto al prossimo post xxx 😘
That's it for today, if this card inspired you don't forget to share the post with all your friends and if you haven't yet subscribe to my blog (by clicking on the join this site widget on the top right of the page).
Now it's time to go, but be sure to be back for my next post xxx 😘
E' diventata per me quasi una sfida provare a ricreare i suoi progetti in maniera alternativa, anche per dimostrare che non sempre serve acquistare gli attrezzi tecnici del cardmaking 😊
Ecco la card alla quale mi sono ispirata!
As you may have noticed lately I've been loving floral cards and I tell you straight away that today's project was inspired once again by Jennifer McGuire.
It has become a challenge for me to give my own spin to some of her cards, mainly to demonstrate that you don't always have to buy all the techic supplies for cardmaking 😊
Here is the card I was inspired by!
Mi è piaciuta fin da subito l'idea di un biglietto perforato e per realizzare questo progetto ho seguito il tutorial di Jennifer McGuire (che potete vedere qui), ma invece di usare le fustelle ed i timbri ho creato un cartamodello che potete scaricare gratuitamente (trovate il link nella lista dei materiali più in basso). Questa è la card che ho ottenuto.
I loved the idea of a see through card staright away and even if I followed Jennifer McGuire tutorial (which you can find here) I designed a template (that you can download for free, the link is in the suplies list below) to replace the dies and stampes she used. Here is my card!
Dopo aver stampato il cartamodello ho ritagliato i vari dettagli, ho poi sistemato i fiori in modo da creare la parte frontale e li ho incollati insieme lasciando degli spazi vuoti.
Dopo di che ho incollato la parte frontale sulla base ripiegando la parte in alto ed ho ritagliato le parti lateriali in eccesso. Per finite ho inserito la scritta al centro usando degli adesivi dimensionali.
After I printed the template I cut out all the details, then I arranged the flowers in order to create the front of the card and I adhered them together leving some space here and there.
I adhered the front of the card to the back by folding it on top and I cut out the excedding bits from the sides. As last step I added the sentiment with foam squares.
Materiali - Supplies:
- White cardstock
Cartoncino bianco -
Card template (you can download it here)
Cartamodello (potete scaricarlo qui) - Foam squares
Adesivi dimensionali
Ok passo e chiudo e vi aspetto al prossimo post xxx 😘
That's it for today, if this card inspired you don't forget to share the post with all your friends and if you haven't yet subscribe to my blog (by clicking on the join this site widget on the top right of the page).
Now it's time to go, but be sure to be back for my next post xxx 😘


Commenti
Posta un commento