D.I.Y. Fall Wreath 2018 - Ghirlanda Autunnale Fai da te 2018
Come sapete adoro decorare in base alle stagioni ed ora che l'Autunno è ufficialmente cominciato non potevo non condividere con voi (come faccio ormai da qualche anno) un tutorial per creare una ghirlanda a tema da appendere fuori dalla porta.
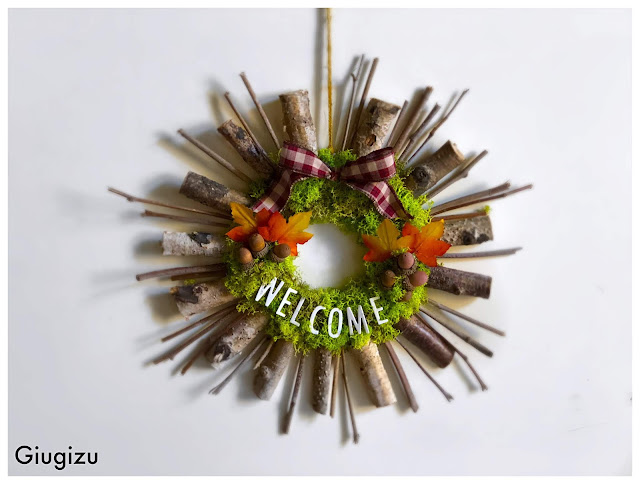
Questa volta ho deciso di utilizzare materiali naturali, per lo più legno e muschio che, volendo, potete raccogliere riducendo drasticamente il costo del progetto.
Inizio col farvi vedere il risultato finale e se l'idea vi piace vi invito a guardare il video tutorial qui sotto, scoprirete che il procedimento non è troppo complicato.
As you know I love to decorate following the seasons and now that Autumn has officially started I had to share (as I've been doing for the past years) a tutorial on how to create a D.I.Y. themed wreath to hang on your door.
This time I decided to use some natural materials, mainly wood and moss which, if you want, you can find in nature bringing the project cost considerably down.
I'll start by showing you the final result and if you'll like it I invite you to watch the video tutorial here below, you'll see that it's not a too challenging project to make.

Vi ricordo che più in basso troverete la lista dei materiali necessari con eventuali link per acquistarli online.
I remind you that below the video you'll find the supplies list with links to buy them online.
Per oggi è tutto, spero che questo progetto vi sia piaciuto e vi abbia ispirato, se così è condividete questo post oppure il video ed iscrivetevi al blog (cliccando su unisciti a questo sito in alto a destra) pubblico nuovi posts ogni lunedì, mercoledì, giovedì e venerdì.
Per iscrivervi al mio canale di Youtube invece cliccate qui (nuovi video ogni mercoledì).
Passo e chiudo e vi aspetto al prossimo post ♥
That's it for today, as usual I hope you liked my tutorial and that you got inspired to craft. If so share this post or the video and subscribe to my blog (by clicking on join this site on the top right of the page), I upload new posts every monday, wednesday, thursday and friday.
Also if you wish to subscribe to my Youtube channel click here (new videos every Wednesday).
I'm signing off now and I'll see you in my next one ♥
Questa volta ho deciso di utilizzare materiali naturali, per lo più legno e muschio che, volendo, potete raccogliere riducendo drasticamente il costo del progetto.
Inizio col farvi vedere il risultato finale e se l'idea vi piace vi invito a guardare il video tutorial qui sotto, scoprirete che il procedimento non è troppo complicato.

This time I decided to use some natural materials, mainly wood and moss which, if you want, you can find in nature bringing the project cost considerably down.
I'll start by showing you the final result and if you'll like it I invite you to watch the video tutorial here below, you'll see that it's not a too challenging project to make.

Vi ricordo che più in basso troverete la lista dei materiali necessari con eventuali link per acquistarli online.
I remind you that below the video you'll find the supplies list with links to buy them online.
Lista Materiali - Supplies List
- Base in cartoncino (la potete ritagliare da una vecchia scatola nelle dimensioni che desiderate)
Cardstock base (you can cut it from an old box in the size you like) - Rametti (le potete acquistare online qui)
Little logs (you can buy them online here) - della colla a caldo
some hot glue - Ghiande finte (le potete acquistare online qui)
Fake Acorns (you can buy them online here) - Foglie finte Autunnali (le potete acquistare online qui)
Fall leaves (you can buy them online here) - Muschio (lo potete acquistare online qui)
Moss (you can buy it online here) - Nastro
Ribbon - Lettere in cartone (simili in vendita qui)
Chipboard letters (similar on sale here) - Spago
Twine
Per oggi è tutto, spero che questo progetto vi sia piaciuto e vi abbia ispirato, se così è condividete questo post oppure il video ed iscrivetevi al blog (cliccando su unisciti a questo sito in alto a destra) pubblico nuovi posts ogni lunedì, mercoledì, giovedì e venerdì.
Per iscrivervi al mio canale di Youtube invece cliccate qui (nuovi video ogni mercoledì).
Passo e chiudo e vi aspetto al prossimo post ♥
That's it for today, as usual I hope you liked my tutorial and that you got inspired to craft. If so share this post or the video and subscribe to my blog (by clicking on join this site on the top right of the page), I upload new posts every monday, wednesday, thursday and friday.
Also if you wish to subscribe to my Youtube channel click here (new videos every Wednesday).
I'm signing off now and I'll see you in my next one ♥


Commenti
Posta un commento